In my previous post I mentioned that I didn’t have any solid white fabric to make my own bias tape. Making your own bias tape allows you to match your project’s fabric perfectly. It’s also a good way to use up some of your fabric stash. In this post you’ll show you how I make a continuous bias strip (the precursor to bias tape) and in the following post I’ll show you how I transform bias strips into bias tape.
What Is Bias
According to Wikipedia bias tape is “a narrow strip of fabric cut on the bias”. I prefer to think of this as a “bias strip” rather than actual “tape” but I digress. Bias-cut fabric is both stretchier and more drapeable than fabric that is cut along the grain
To understand what “cutting on the bias” means, it’s helpful to think about how woven fabrics are made. First the longitudinal or lengthwise yarns (aka warp yarns) are secured to a frame or loom. Next the latitudinal or transverse (aka weft) yarns are drawn through the loom while alternately being inserted under and over the warp yarns . The selvage is a finished edge that prevents a woven fabric from fraying and it runs parallel to the fabric’s warp.
When you look at a piece of woven fabric, you’ll notice the selvage along both long edges. It’s common for the selvage along one edge to match the fabric’s pattern while the selvage along the other edge may not. Warp threads are parallel to the selvage and weft threads are perpendicular to the selvage. Bias is 45° to the warp and weft.
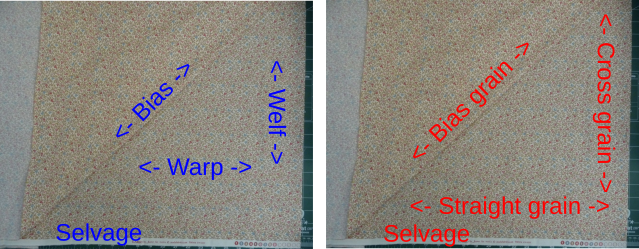
The orientation of the warp and weft yarns is also described as “grain”. The straight grain of a fabric is parallel to the selvage and the cross-grain is perpendicular to the selvage. Bias grain is 45° to the straight grain and cross-grain.
How Much Fabric Do I Need
When I’m making my own bias tape for a project, the first thing I want to know is how much fabric do I need to make the continuous bias strip. I want to ensure that I have or buy enough fabric for the project and the bias tape. I’d also like to avoid making too little or too much bias tape.
To determine how much fabric you need, you first need to know the length and width of the bias strip you’ll be using. You can use either Metric or Imperial measurements so long as you use the same system and units for both measurements. Often the instructions for your sewing project will provide this information.
Here are 2 examples. The Easy Phone Charger Holder project (see my project review here) uses 38” of 1/2” wide double-fold bias tape. The length and type of bias tape are specified. The Famous Maker DIY Clutch Bag (project review forthcoming, link to project here) uses 1 5/8 yards of bias binding. The length is specified and I’m going to assume 1/4” wide double fold bias tape because the overall dimensions of the finished project are ~7” wide by 5” tall.
I look up the width of bias strip that is needed to make the common sizes of bias tape on Whip-stitch.com’s “cutting guide for continuous bias tape”.
I’ve recreated a portion of Whip-Stitch.com’s table below:
| Continuous Bias Strip Width | Bias Tape Type & Width | ||
| Metric | Imperial | Single Fold | Double Fold |
| 9.5 mm | 3/8” | 1/4” | 1/8” |
| 22 mm | 7/8” | 1/2” | 1/4” |
| 35 mm | 1 3/8” | 3/4” | 3/8” |
| 47.5 mm | 1 7/8” | 1” | 1/2” |
| 98.5 mm | 3 7/8” | 2” | 1” |
To create 1/2” wide double fold bias tape for the Easy Phone Charger Holder project, I need a bias strip that is 1 7/8” (47.5 mm) wide. To create 1/4” wide double fold bias tape for the DIY Clutch Bag, I need a bias strip that is 7/8” (22 mm) wide.
Once you’ve determined the length and width of your bias strip, multiply these numbers together to calculate the total area of required fabric. Take the square root of the total area to determine how large to cut your square of fabric OR divide the area by the width of your fabric to determine how much yardage you need.
I’ve tabulated the results for the Easy Phone Charger Holder and DIY Clutch Bag.
| Easy Phone Charger Holder (38” of 1/2” wide double fold bias tape) | ||||
| Bias Strip Length | Bias Strip Width | Total Area of Bias Fabric | Cut A Square | Cut Yardage* |
| 38” | 1 7/8” | 71.25 square inches | 8.44” one a side | 1.98” of 36” wide fabric |
| 96.52 cm | 4.76 cm | 459.68 square cm | 21.4 cm one a side | 5.0 cm of 91 cm wide fabric |
| DIY Clutch Bag (1 5/8 yard of 1/4” wide double fold bias tape) | ||||
| Bias Strip Length | Bias Strip Width | Total Area of Bias Fabric | Cut A Square | Cut Yardage* |
| 58.5” | 7/8” | 51.9 square inches | 7.1” one a side | 1.4” of 36” wide fabric |
| 148.6 cm | 2.2 cm | 326.9 square cm | 18 cm one a side | 3.6 cm of 91 cm side fabric |
The SewingLoftBlog has a great post (Calculating continuous bias) about calculating the yardage area and square area needed, and determining how much bias strip a given area of fabric with yield. If math isn’t you’re strength, the same webpage also a downloadable cheat sheet to look up bias tape and fabric area.
Make Continuous Bias Strip
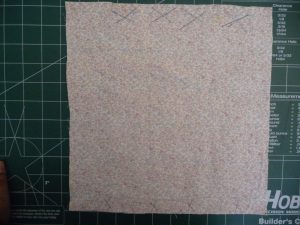
Step 1)
Place your fabric on your cutting table wrong-side up. Mark the selvage edge(s) on the back of your fabric (I used a series of “x”s) then trim off the selvage. Make your marks large enough or far enough inside the edge of the fabric that you don’t cut them off when you trim off the selvage.

Step 2)
Measure your square or rectangle as per your fabric area calculation(s). If you’re not using the full width of your fabric, place selvage (straight grain) marks along the edge of your square or rectangle that is parallel to the selvage (straight grain).
Step 3)
Cut out your square or rectangle of fabric.
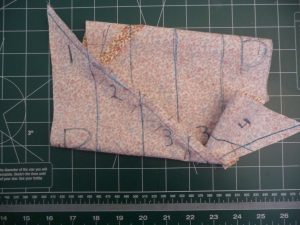
Step 4)
Fold one of the selvage (straight grain) edges to a cross-grain edge to form a 45° angle. The 45° angle is your bias grain.

Step 5)
Cut along the bias grain then mark the bias edges with a “B”.

Step 6)
Place both pieces of fabric face down and line up the selvage (straight grain) edges. You will form a parallelogram with both bias edges parallel to each other and both cross-grain edges parallel to each other.

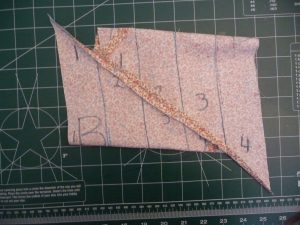
Step 7)
Pin the pieces along the selvage (straight grain) edges, with right sides together. Sew along the selvage (straight grain) edge using a 1/4” seam allowance, then press the seam allowance open.

Step 8)
Place your fabric face down. Starting at 1 bias edge, make a series of lines parallel to the bias edges. The lines will be spaced apart by whatever amount you decided was the width of your bias strip.

Step 9)
Trim off any excess fabric. When I calculate the amount of fabric I need, I rarely have anything to trim. When making continuous bias to use up some fabric scraps, you often have excess fabric to trim. Number your strips along the cross-grain edges and mark your seam allowance (I’m using 1/4”) along the cross-grain edge.

Step 10)
Form an inside-out fabric tube by matching the cross-grain edges. If we match the numbers, we’ll have a series of fabric rings when we cut along the bias lines. To create a single, continuous strip of bias tape, we need to offset the numbers by 1. The outer end of strip 1 doesn’t connect to anything, the inner end of strip 1 connects to strip 2, strip 2 connects to strip 3 etc.

Step 11)
Pin the cross-grain edges together so that the bias lines match along the cross-grain seam allowance you drew in step 9. I find it easier to start pinning in the middle and then work outwards toward the ends.
Step 12)
Sew along a cross-grain seam allowance and press the seam open. Cut along the bias lines to complete your strip of continuous bias.

Here’s a photo of some common widths of bias strip. Left to right 1 7/8” (48 mm), 1 3/8” (35 mm), 7/8” (22 mm) and 3/8” (10 mm).

In my next post, I’ll show you how to turn continuous bias strips into continuous bias tape.
Have you used bias tape? Have you or will you make bias bias tape? Comment below and/or pin me for later.
Tanya


Help support Sewn By Tanya
If you love what I do, have learned from reading my blog, and/or want to support my work financially, consider becoming a Sewn By Tanya patron. Your monthly donation of $1 or more will help Sewn By Tanya grow and expand. A minimum $6 per month gives you access to Sewn By Tanya Patreon only content. There’s so much I’d love to do and you can help make it happen.


If I am making corded patio cushion covers can I use excess fabric that is on the grain to make the cording to save money since my fabric is 42 dollars a yard and I may be short. I also don’t want seams since it is rather thick fabric.
.
Hi Terri,
Using your excess fabric should work. Keep in mind that grain-line strips won’t stretch around curves and corners the way that bias strips do. That being said, it’s a commonly used technique to bind the edges of a project with grain-line strips. Examples include quilts, and a variety hanging pocket organizers.
Tanya