When I searched online for sun hat patterns, I found some gender neutral styles. In this post I review the Reversible Sun Hat by Mollie Johanson from The Spruce Crafts website.
Read the tutorial and download the pattern pieces here:
For the purposes of my review, I’m going to summarize the tutorial, tell you what I did differently (if anything) and share my general thoughts about sewing the project.
The online tutorial beings with some photographs of a finished hat and a description of the project. Next is the materials list, tools list and fusing instructions.
Linen and quilting weight cotton are recommended for this pattern. I used quilting weight cotton for both layers of my hat. I wanted my sun hat’s brim to be stiff so I added a layer of Pellon 808 fusible interfacing to one half of my brim pieces.
Step 1 Pattern & Cutting
This pattern is available in two sizes and I selected the small/medium size pattern pieces. Usually downloadable patterns are PDF files so I was surprised to discover these were jpegs. Fortunately they each had a 1-inch gauge square. It took some fiddling with my printer settings to get the pieces to print out correctly.
Coincidentally both the Reversible Sun Hat and Lorenna Buck Designs Sun Hat have seven pieces per hat layer (interior layer and exterior layer).
I fused my fabrics before cutting the pieces.
Cut materials for har
Step 2 Crown and Brim
It was difficult to find any seam allowance information for this project. I assumed that the crown pieces and brim pieces should be sewn together using a 1/4” seam allowance as the instructions state the crown is sewn to the brim using a 1/4” seam allowance.
The first time I sewed my crown and brim together, my brim shifted and wrinkled. Do use more pins than you think you need to avoid this. Marking the halfway points between each crown and brim seam also helps.
My first crown & brim
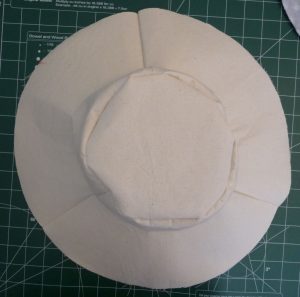
Step 3 Top
Adding extra markings between the top markings and crown seams made this step easier too.
Step 4 Second crown, brim & top
This time I added extra mid-point markings along the curves of the crown, brim and top before sewing any of the pieces.
My second top, crown & brim
Step 5 Add trim
Adding trim is an optional step. I used some 2 mm cord and a scrap of matching fabric to make piping. You can read my DIY Piping Tutorial here.
Homemade piping
I basted my piping in place along the edge of one brim according the tutorial’s instructions.
Close-up of piping sewn onto hat
Step 6 Sew layers together
I used my plinking shears to trim the curves before sewing the two layers of my sun hat together. Next I pinned the two hat layers right sides together. As per the instructions, I offset the brim seams to avoid bulk. Sewing the seam was tricky as I had to avoid sewing too close to my piping, without being able to see the piping.
Step 7 Top stitch
In addition to top stitching 1/8” from the seam, I top stitched several lines around the circumference of the brim. These lines were spaced 1/4” apart. While I was top-stitching, I noticed that some of my brim seam allowances had folded up inside the hat.
That’s it! There are seven steps.
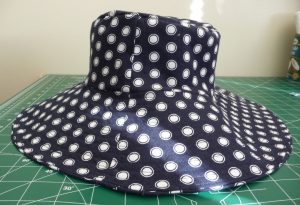
Here are some photos of my finished Reversible Sun Hat:
Side view of one sideTop view of one sideSide view of second sideTop view of second side
Conclusion
This project came together just as quickly as my Lorenna Buck Designs Sun Hat. The Reversible Sun Hat is a style that I’ve seen both men and women wearing. I choose a dotted fabric and trim for a feminine look. Omitting the trim and selecting solid colors would make this hat more masculine. The numerous photographs made the instructions easier to follow, but some parts weren’t as clear as they could have been (eg missing seam allowance information). Overall, this project came together well and I would make it again. It certainly has great potential as a gift item.
Have you sewn a hat? Would you try this pattern? Comment below and/or Pin me for later!
Tanya
Sewn By Tanya Project Review | Reversible Sun Hat by The Spruce Crafts
Help support Sewn By Tanya
If you love what I do, have learned from reading my blog, and/or want to support my work financially, consider becoming a Sewn By Tanya patron. Your monthly donation of $1 or more will help Sewn By Tanya grow and expand. A minimum $6 per month gives you access to Sewn By Tanya Patreon only content. There’s so much I’d love to do and you can help make it happen.