In my previous post (Scrap Bucket Basket Review) I mentioned that I was turning some of my fabric scraps into storage containers. This tackles of issues of having too many scraps and too little storage space by both reducing that scrap pile and creating a new storage container. Effectively, killing two birds with one stone. In this post I’m reviewing the Glorified Scrap Basket by SewSewMaria.
The online tutorial this project is available here:
Note this pattern is for personal use only.
Here are my thoughts on this project.
The tutorial beings with a photograph and a few paragraphs describing the author’s motivation for creating the tutorial (a container made from fabric scraps to store more fabric scraps). The project’s finished size and how to increase/decrease the finished size are covered next.
Part 0
Before we can dive into this tutorial, we have to prepare 2.5” squares of quilting weight cotton. You’ll need 63 squares if you’re making the project as described. I had previously sorted my stash of fabric scraps by fabric type (canvas, home décor, quilting weight and lighter cottons, polyester, nylon) and scrap size (~ fat quarter, ~ letter-sized, ~ ½ letter-sized, and everything smaller than that). I cut a 2.5” square piece of cardstock to help me identify which of those small fabric scraps were large enough for this project.

My scraps weren’t sorted by fabric type and my squares included light weight cottons, polyester, home décor weight, and unknown fabrics. Reviewing my smallest fabric scraps and cutting the 2.5” squares was the most time consuming part of this project.
Part 1
Once we’ve gathered all of our materials, we arrange our 2.5” squares in a pleasing pattern. I took some photos of my 2.5” squares arranged the way I planned to sew them together. It was a handy reference later on.

This tutorial contains numerous photos and they really made following along easier. Labels on each photo to identify which step they were for were an added bonus. In some sections of the tutorial I followed the photos rather than reading the text.
Part 2
Part 2 covers all of the sewing steps.
Step 1 Creating the patchwork panel.
This was my first quilting project and I would have to admit that precisely cutting 63+ plus identical squares of fabric was a challenge for me. I ripped and re-sewed 2 rows to correct squares that were far from square and still had difficulty lining up all the seams when it came to complete the panel.

Step 2 Interfacing your panel.
I used fusible fleece instead of the recommended foam interfacing. Knowing that my panel wasn’t quite square, I decided to baste it to the interfacing before I cut the interfacing. I “basted” these layers together by pressing my patchwork panel to the fusible fleece with my hot iron.
Step 3 Quilting your panel.
I really liked how the author’s finished baskets looked so I decided to quilt my panel in the same way. Those of you who have experience quilting will probably laugh… it took me several false starts to discover that a 1/4” quilting foot was the best presser foot for the job. I can confidently say I’ve never used that particular foot before.

Step 4 Cut your lining.
I was concerned about my lining fitting well so I pinned my quilted panel to the lining, right sides together and then cut around the panel. Before I removed the pins, I marked 1 long edge of the quilted panel with an “x” and the same edge of the lining with another “x”.

Step 5 Baste the handles in place.
Do take care to ensure that the short edges of your webbing lines up with the top edges of your front and back pieces. Mine were slightly off and it caused problems when I got to step 9.
Steps 6 & 7 Sew the corner seams then finish assembly.
The lining is sewn with a slightly larger seam allowance than the quilted panel. Other projects I’ve sewn have used this technique to improve the fit of the lining when the exterior is thicker. I suspect that is the motivation for doing so with this project.
Steps 8 & 9 Create a faux binding.
This was my first time creating a faux binding. I was surprised by how easy it was to create such an impressive looking finish.
Here are some photos of my finished Glorified Scrap Basket.


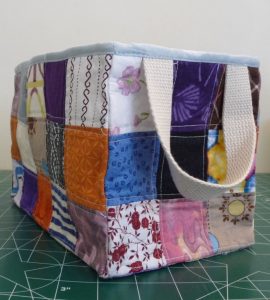
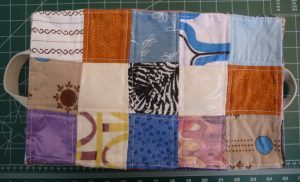
I really enjoyed sewing this project. The well thought out instructions and photographs made it easy to put together a quilting project without any quilting experience. My finished project looks impressive, even though I had some issues with cutting the squares precisely. It is a great way to use up some fabric scraps and it adds to the decor of my sewing space. I cut more 2.5” squares than I needed for a single Glorified Scrap Basket, and I look forward to sewing another when I’ve accumulated enough squares to do so.
Have you sewn a fabric storage container? Do you have any ideas for using up fabric scraps? Comment below and/or Pin me for later!
Tanya


Help support Sewn By Tanya
If you love what I do, have learned from reading my blog, and/or want to support my work financially, consider becoming a Sewn By Tanya patron. Your monthly donation of $1 or more will help Sewn By Tanya grow and expand. A minimum $6 per month gives you access to Sewn By Tanya Patreon only content. There’s so much I’d love to do and you can help make it happen.


